Showing posts with label spot metering. Show all posts

Picking the correct natural light for portraits.

"Oh it's sunny ! let's go take pictures !"

...or let's not ?

What is actually good natural light? This short post should help you with some basics on light for photography.

Let's start from a well know studio habitant: the soft box. While shooting portraits with artificial light, the big issue is the directionality of light: because it comes from a narrow source and in straight line, it creates shadows. Now shadows can look cool and be created on purpose, but many time you wan't to avoid the black areas under the eyes and next to the nose, on the neck or even on your background. In order to diffuse the light, we use soft boxes. It forces the light to bounce inside the box and come out from a very large surface. Instead of a 2 square inches light source, you have a 1 square meter light source that doesn't even shoot light straight. The next two pictures speak for themselves:

Courtesy of weichongraphy.wordpress.com

Now one of the best ways to have a natural soft box is to use a window:
- with a light transparent white curtain if the sun directly hits the window (otherwise it is very directional and hard to expose between light and dark zones in the room).
- without curtains if the window is hit by non direct light or if it's rather cloudy. It will give some direction to the light and it will yet be quite even and smooth. See for yourselves:

Thanks to Ema, Mamiya RZ67 pro II F2.8

Now shooting outdoors. I find that a bright sunny day is actually a pain, unless you want to create that burning sun, strong shadow effect that suggest heat. I live in Ireland, and fortunately, the sun is only a myth here. Instead I have plenty of cloudy skies with very even light.

Boring? Yes it can be if you don't use depth of field & expose correctly. But if you pull those right, you can have very nice, soft images, as follows:

 Mamiya 645 1000s, 80mm (246$ online...)

 Nikon D80, 85mm @F1.8 


Last two are with the Mamiya 645 1000s too.

So don't be afraid of cloudy days. I find that the overal best case scenario is sun with some clouds. In other words, any average day :)

If you shoot in a very harsh sun light, don't hesitate shooting against the sun : you subject's face will be evenly lit, and if you spot meter (measure exposure) on his / her face, you'll have a nice back light effect like this:

Mamiya 645 1000S: I made sure Albin's face was not directly hit by the sun to avoid bad shadow. Ladies: the girl behind is his GF, don't even ask.

If they face the sun, they'll close their eyes, have ugly shadows on the face, yuk ! In that case, you might want to use your flash for some fill light.

Last but not least, you can do one cool thing with very strong sun light, this:


Nikon D80, 50mm F1.8 (100$ lens...)


On this picture, Deborah is in a park in Dublin 4, saturday afternoon, 2pm bright sun. So how come only her face is lit and the rest came black? Well that has to do with something call dynamic range, that I would describe as a camera's ability to restitute details in extreme bright or dark zones.
HDR for example is artificially made extreme dynamic range: you take a shot exposed on dark objects of the image, one shot exposed on bright objects, and you mix the two so everything is bright and details.
Well most digital cameras have a very poor dynamic range (film does much better). So if you measure the correct exposure on the brightest part, in that case her face, the rest will be far to dark to show at that exposure level. 

Now go and shoot stuff.


Portrait "how-to" part 1: set up your camera & framing

1/ Set your camera to spot metering (or meter on the face for those using a handheld meter)

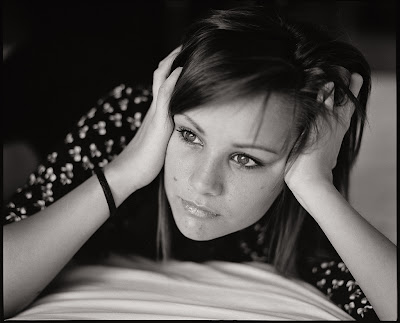
Let's start by looking at a portrait and notice a few important things.


On that image, the skin is neither too dark nor too bright, just the way it should be. The background is very dark but it doesn't matter since we want to extract the face from the rest.

It is important that you tell the camera where to meter, i.e. what is the zone that should be correctly exposed. Most cameras now offer 3 options:
  1. spot metering: measures the light on a given spot of the frame
  2. extended spot metering (name varies): measures the light on and around a given spot, but not from all the picture area
  3. matrix metering: measures light on the entire picture to make an average.


In that picture, light was measured on on the chick, with spot metering. With matrix measurement, the dark background would have forced the camera into exposing more, hence the skin would be too bright and come up white.
When shooting portraits, I highly recommend you set your camera to spot metering.

The button on your camera should be next to those logos:


2/ Now let's take care of the AF, shutter speed and aperture:
In order to make sure the eyes are sharp (if shooting an academic portrait it is rather key, we'll discuss more creative portraits in an other post), you will need a few things:
  • Set your autofocus to a spot AF that you hand pick, and make sure that AF spot in on the eye.
  • Set your autofocus to continuous, so the camera never stops focusing. It ensures that if the subject moves, the spot you're aiming at (the eyes) is always sharp.
  • Make sure your shutter speed is high enough, I'd recommend 1/160 second or more. Under 1/100 you'll struggle to pull a sharp portrait
  • In order to do so, you can: fix the speed in speed priority mode, or force a large aperture (see this article from an explanation on aperture) in aperture priority mode. If the light is low, raise the ISO to increase sensitivity, allowing faster shutter speed.
When it comes to lenses, use anything from 50mm to 135mm. More and you'll need to be miles away and will shake (plus those zoom have low aperture in general), less you'll have a distorted round face looking funny.

Your camera is now ready to shoot portraits, time to take care of your own readiness :-)

3/ Composition & Framing
I won't talk about everything in that first post, composition, use of blur and much more will come later. Instead let's just give a solid introduction to framing, in a very academic way.

  • The rule of thirds: it is a guideline more than a rule, many great images don't respect it but it can still prevent many of you from taking some pretty horrible portraits :-p. The idea is that you can compose by splitting your image into horizontal and vertical thirds, as on the following picture.

Long story short, the idea is that elements on the picture should not be centered, but rather somewhere along those lines.
Second important rule, you want to leave space where the subject is looking, or moving, as for that panther (baaaad kitty !) on top of the picture. If you have to much space where nothing happens, it's more or less useless.
Of course since this is an art and not building bridges, you can find plenty of counter examples, but this is a good start before you begin working on creative shooting.

An other common misconception in portraiture is related to framing: no you don't need to show the entire head or body, you can crop it, it works. The fact is, if the missing part is obvious, i.e not part of a specific movement, the brain will extrapolate it. Take a look at that top picture again, does that matter that we don't see the elbows? No it doesn't, because we can all imagine what those elbows look like.

The same way, you can crop the head in order to give your image a different focus. Let's now take a look at this one:


What's important here it the torsion of the body, showing the posture, laying. Notice that I cropped the head a lot, in order to be closer to the eyes (my key focus point here). I left a lot of space on top since this is about the posture, and a lot of space to the right as that where her eyes are pointing. Anything that's behind her would be useless and dilution of the subject.
Also notice that the face here is placed more or less at the crossroad between third lines.

Last but not least for this Part 1 or the portraiture guide : when you travel, and your lovely lady is in front of the Eiffel tower, don't try to get a good portrait and a good architecture picture at the same time. You'll end up with that, and it's not worth buying an expensive DSLR:


No offense to the lovely couple (no idea who they are)

This is neither a portrait, nor a good Eiffel tower picture. You shoot digital? Then you can shoot plenty, so pick your fights. First shoot a portrait, then shoot the tower :), and you'll end up with something like this :

Notice that the eyes are on the top third line, not mid picture


You instead have two picture of your trip to Paris, each with a purpose, each quality pictures. You could also shoot two vertical images, one of the tower, one of your beautiful girlfriend, and make a diptych out of the two.

That's it for part 1, please leave comments if you find it useful, not useful, boring, not detailled enough, or just to say hello :)